#Product Description Can't find the blender
Explore tagged Tumblr posts
Visit Tumblr Blog
Explore Tumblr blogs with no restrictions, modern design and the best experience.
Last Seen Tumblr Blogs


Fun Fact
The Tumblr office adopted Tommy, an 11-year-old Pomeranian.
Video
youtube
Automatic Magnetic Self Stirring Auto Mixer Coffee Cup Usb Rechargeable mug
#youtube#mug#Product Description Can't find the blender? No coffee machine? Too many power cords? It doesn't matter. Here's a very interesting coffee cup
1 note
·
View note
Text
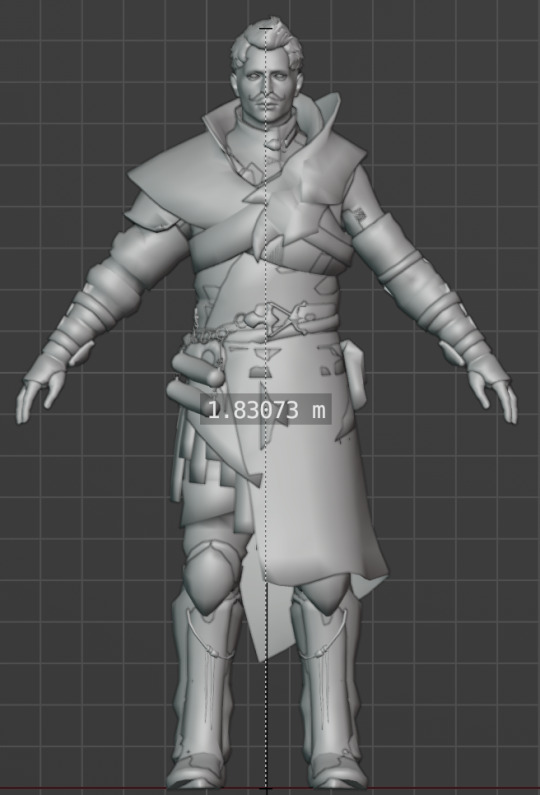
Heights Based off Official Model Scales, Dev Words, or Lore specified
Updated: 05/2024
I find it delightful and fits into the feral and desperate need I have for Thedas to be experiencing mega fauna and flora. Important note, the only height that is canon is Bull's as it is mentioned in the lore books World of Thedas vol. 2. The rest are based off scaled models and dev words; the latter up to personal preference on how canon that is.
I've also updated these since the last post as wonderful people reached out and gave me their numbers as well as updating Dorian's height to what his character model height is based on Gaider's tweet.
Going from shortest to tallest we have this:
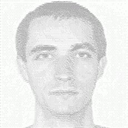
Varric - 5' - 5'3 / 152.4-160.02cm [Source]
Morrigan - 5'8 / 172.72cm (Sans heels) [Source]*
Alistair - 6' / 182.88cm [Source]
Dorian - 6' / 183cm *
Solas - 6' / 182.88.cm [Source]
The Iron Bull - 8' / 243.84cm*
Elaboration (Below the Cut)
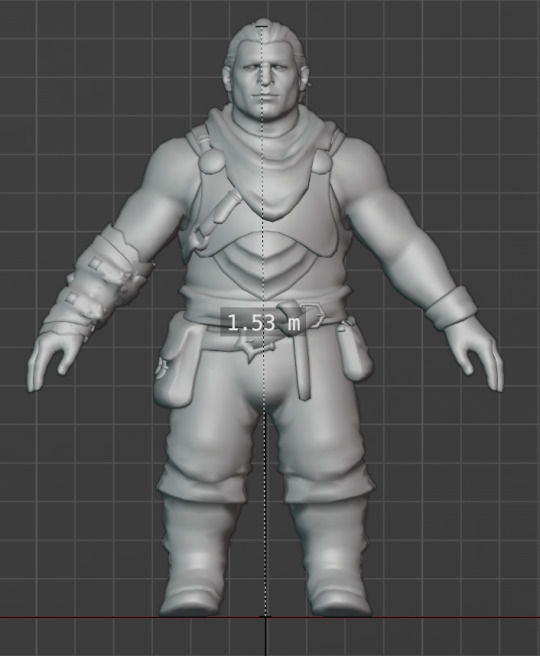
Varric:
Varric's statute details included below. I used the range because when I previously posted about heights there were disagreements on his height. But it also led to several people giving me their measurements on the statue! Which thank you so much for sharing! Measurements can vary wildly, so the more data is always better.
Additionally, the 153cm / 5' height is echoed by his in-game model, so I think that is a definite minimum for his height.
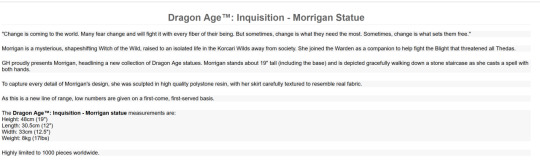
Morrigan:
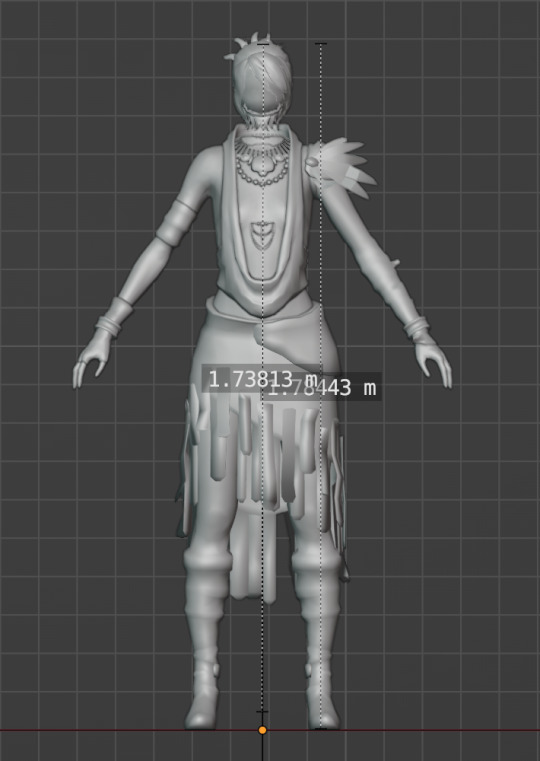
Morrigan's statue details and the help of a friend who has her statue, gave us the numbers for Morrigan's height with and without heels. These numbers are also echoed in her in-game model of 173.81cm / 5'8 sans heels and 178.44cm / 5'10 with heels. (Please excuse the lack of a face on her. For some reason my blender says it is an invalid file and I can't figure out how to fix it.)
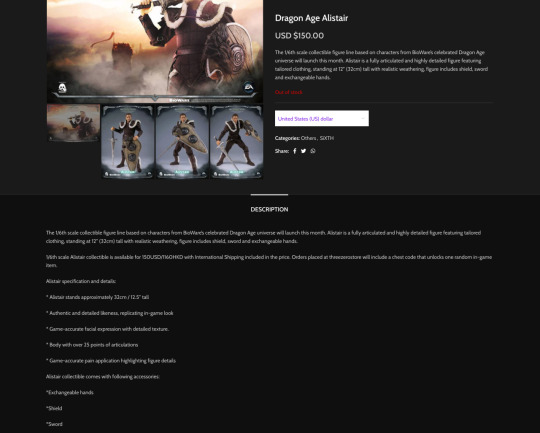
Alistair:
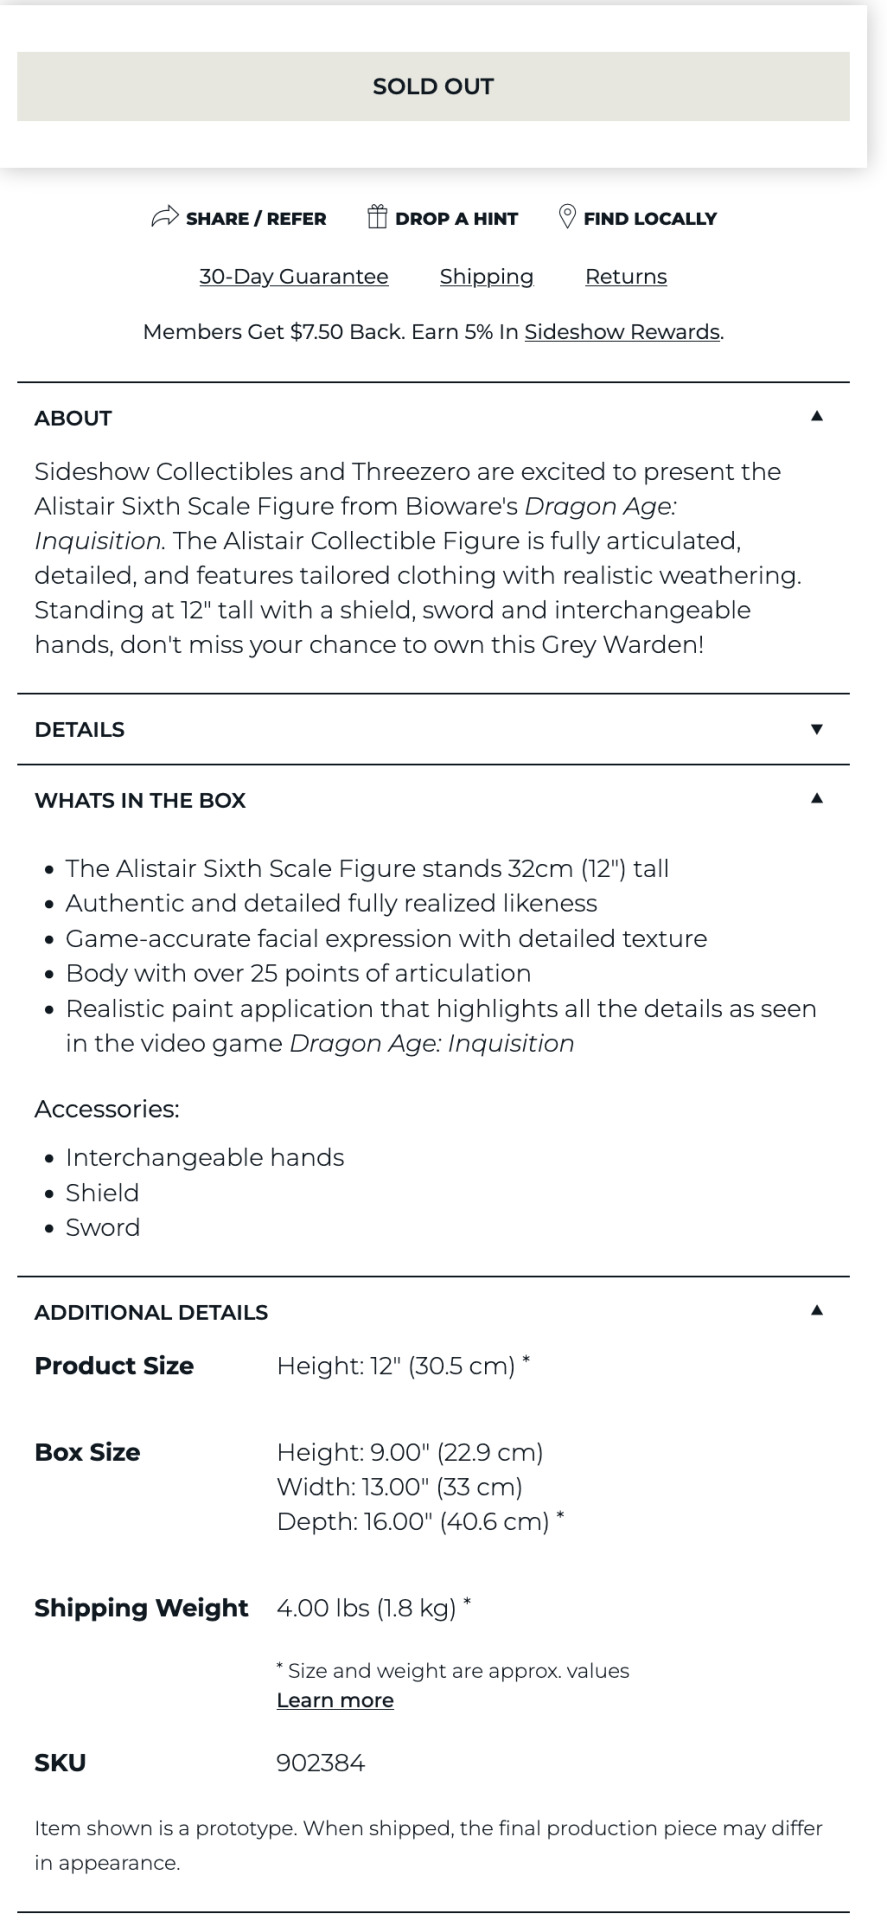
The Sideshow listing and the manufacturer Three Zero listing give two numbers 12.5" and 12", with the latter being the one repeated the most.
I will note that there are some issues with the provided numbers as 12" is 30.62cm and the listing states he is 32cm which is 12.5". But considering previous conversation on the matter and that cm in scaling of these items seem a bit more unreliable in the actual size of the product (they are approximates after all) I chose to stick with the provided measurements in inches due to it matching up with his in-game model height of 183.5cm / 6' (technically its 6' and 1/16 of an inch but rounding down here).
If you want to choose to stick with the cm measurements, on 1:6 scale, 32 cm would be 190.5cm / 6'3 for Alistair.

Dorian:
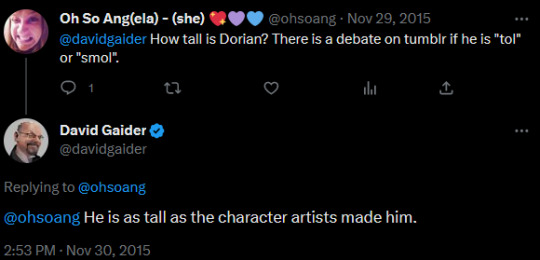
When asked about Dorian's height, David Gaider specified that: "He is as tall as the character artists made him." [Source]
Originally, I had put Dorian's height at a range due to the fact he is the ideal proportions at 8 heads tall which by modern industry standard means he's 6'2, but by earlier standards means he's 6'. But now that I have access to the character models used in-game and blender, we know for certain his height is supposed to be 6' / 183cm.
Solas:
So the listing images gave off a very incorrect estimate of height, but kind of to be expected when they photoshop soda cans in. Thanks to the many people who sent me numbers, here and on other places. Solas from front foot to head is 18" / 46.5cm of his 20" / 51cm statue.

This height of 6' is also echoed by an old tweet from Trick Weekes saying Solas was 6'-ish ft.
The Iron Bull:
In World of Thedas vol. 2 p. 255 they have the description that he is 8' tall.
Everyone in the Chargers is someone who can look at an eight-foot horned giant and say, 'Yes, I trust that man with my life.'
If you're wondering if that includes the horns? Up to you, it's not specified. If you want to do sans horns, according to the scaling of his statue, they math out to adding roughly 5". Which would make him 7'5 (226.06cm).
It took a lot of math on my part, measuring his calf, thigh, and then up from there. But he does measure to 8' / 243.84cm when you scale the number of 62cm / 24".
Additional Notes:
For transparency, as noted in this post on in-game character model heights for Inquisition, Solas is noted to be 5'10 / 179cm and Iron Bull is 6'9 / 204cm. These are at odds with the dev word and lore notes, so they aren't used for comparison here. As there are likely game reasons/limitations they do not have wholly unique character models in terms of height. (Such as doorways, animation differences, armor, ect.)
#dragon age#meta#gaming heads#alistair#alistair therin#dorian#dorian pavus#morriagan#iron bull#the iron bull#solas#varric#varric tethras#To reiterate#the only canon height is Bull's#The rest are just assumptions based on official merch and game models
61 notes
·
View notes
Note
Hello there! I'm Eden :D I LOVE your renders! I've been rendering for well over a year at this point, however I only stuck to the super basic stuff since it took me a year before that to even know how to do it at all. I've wanted to up my game and get to where you are now. I'm SO SORRY if this question was asked already (I haven't gotten too far in your posts yet), but;
How do you personally edit your renders? I understand you use photoshop, but how do you do it exactly? Your renders have that kind of digital art style, like you drew them yourself. Feel free to be as descriptive or brief as you'd like!
Hi Eden!!! Thank you so much! 🥹😍♥️
I've followed you back and glad we're moots! I'd love to see some of your work!
I'm not sure if I've answered this before but I'm happy to answer it again! Also I haven't advertised it in a while (and I really need to try to get up a new tut, maybe soon), but my alt account is a Render School where I post tutorials, with plans to post editing tutorials in the future!
But honestly as far as my editing, I really don't do much.
Actions are my secret weapon, and I have a few favorites/go-tos I'll link! A few are by simmers and a few are just action sets. I'm in a family of photographers, so I have access to a wealth of resources for my editing.
Sonder set by @intramoon
Cold Water set by @intramoon
Retro Prime photoshop actions
Indie camera photoshop actions
But my "secret weapon," as it were, and the set of actions that I think most helps me accomplish that digital art style is a set of actions that are sadly expensive and hard to find now.
My favorite set is by Totally Rad! and I think in recent years it's been folded in to this Pixel Sugar product on their website. I know that's a steep price point but it's possible you can find it around the corners of the Internet for less, or if you can't, you might be able to find "dupes" of the better ones, which imo are:
Technicolor dream world
Super Fun Happy
Bullet Tooth
Grandma's Tap Shoes
As for my method, I know a lot of simmers paint over their renders, and I've done that a few times but find I'm too impatient tbh. My goal is always to have to do only minor touchups over my renders and some color/vibe adjustments before the finished product. My "raw" files are always exactly what blender spits out for me, unaltered in any way except to resize them for Tumblr.
To get that digital art style, I'd recommend rendering with alpha details if you don't already. If your computer can't handle alpha cc in the game, DM me and I can give you some pointers (sneak peek info for a future tut lmao) on how to accomplish it without bogging down your game.
When I go into photoshop I adjust the brightness and contrast, as I tend to personally prefer high contrast pieces that contain dark subject matter but you can still see the details. Then I'll paint/blur/clone/adjust anything that needs it, then I'll "stack" and adjust a handful of actions before applying edge blur and vignette and any other color adjustments (levels, curves, etc).
That's a very oversimplified rundown of what I do, but really overall my editing process is simple. The bulk of my work happens in blender itself. I find that the more time I take to perfect the lighting and shadows and angles in blender, the less frustrating the editing process and the happier I am with the end result. So, that said, be sure you're spending a lot of time in blender getting the light and shadows to be exactly where you need/want them to be before running it.
I know this is a bit long I'm sorry! If any of it is super confusing or you'd like a more in-depth look at any of it please let me know! I do plan to do editing tutorials for my side blog, but the latter half of this year has kind of run over me like a train, and for now I'm just trying to get by day by day. But I'm happy to help if you have more specific questions!
& thank you again!! ♥️
#replies#thank you so much this literally made my day#I was having a bad one too ugh I needed this#mini blender tutorial#tutorial ish#sims 4 blender tutorial#sims 4 render tutorial#sims 4 editing tutorial#I can't tell yall how happy it makes me when yall love my work#legit holding back tears#♥️♥️♥️
33 notes
·
View notes
Text
So I got a comment from @dreamstormdragon asking for tips on how to get VRoid models to work in Blender.
I realized my answer is wayyyy too big for just a reply, so I'm making a whole post about it!
Without further ado, here's my VRoid-Blender workflow:
1 - Use a later version of VRoid Studio. Do not use the beta version! I think I'm currently using v1.28.0.
2 - Use an addon to make .vrm files compatible with Blender. The one I use is the “VRM Addon for Blender”, which you can find here: https://vrm-addon-for-blender.info/en/
Make sure your version of Blender is higher than 2.93. Installing addons is pretty easy, all you have to do after downloading the zip folder is open Blender > got to Edit > Edit Preferences > navigate to the Addons tab > Install > click your zip folder > hit the checkmark to activate it > done! After installing, you should be able to import .vrm files by going to File > Import > clicking the new .vrm option. If you encounter any problems while installing, I recommend watching a video on how to install Blender addons.
3 - So now your VRoid is in Blender. Epic! Most imported VRoids come with a default rig, but it's very basic and has no IK abilities. IKs let you move the hands and feet of the model, by extent automatically bending the arms and legs of said model. It makes posing a lot easier than manually changing each individual bone’s position.
So I use more addons to change that: “Auto Rig Pro” and “Auto Rig Pro: Quick Rig”.
Auto Rig Pro lets you easily make a new, more complex rig for your VRoid character. However, it does mess up the original facial rig, so that's why I use Quick Rig on VRoids. It lets me just add IKs to the default rig, without having to make a new skeleton! It's awesome!
BIG WARNING: You have to already have Auto Rig Pro in order for Quick Rig to work. You can't download Quick Rig by itself because it's connected to Auto Rig Pro. Which sucks because Auto Rig Pro is no longer free (I got it for free during a giveaway for Blender’s anniversary).
You can download Auto Rig Pro here: https://blendermarket.com/products/auto-rig-pro
Download Quick Rig here: https://blendermarket.com/products/auto-rig-pro-quick-rig
Auto Rig Pro has different pricings ranging from $40 USD to $182 USD depending on the features you want, but Quick Rig costs just $10 USD. The installation process is basically the same as the VRM addon earlier. Again, if you have any trouble installing it, watch a tutorial!
4 - But what if you don't want to spend money? Here's my previous rigging process:
Instead of using Auto Rig Pro and Quick Rig, I used the addons featured in this YouTube video: https://m.youtube.com/watch?v=-k1eKcQz29o&pp=ygUUdnJvaWQgbWl4YW1vIGJsZW5kZXI%3D
Basically, the addons shown in this video let you convert the default VRoid rig into a Mixamo rig, which comes with IKs! The video has download links in the description for each addon that you will need, and it also shows how to use them. Best part, all the addons are free!
I animated my Bluey model using a converted Mixamo rig, so it works pretty well. I just like Auto Rig Pro/Quick Rig more because it's a simpler, cleaner process. But both options get the job done, so choose whichever works more for you!
6 notes
·
View notes
Text
Check-in for October 25th, 2023
Welp, The Present is a Gift has officially broken 8,000 words and is rapidly approaching the 10k mark! Also, fun fact: according to the outline, I haven't even finished writing the first chapter. This terrifies me when I consider the later chapters which have way more plot packed into them.

Despite me writing out a very detailed plan for the project, it feels like I'm learning new things about the characters with every sentence I write. Twig is apparently a big fan of learning weird, obscure words and is sad that her old hobby of reading dictionaries has been dampened by her struggling to learn how to read footprint runes. You think you know a gal...
I spent most of today working on programming assignments and even got a nice comment on a past submission I sent in. In it, I mentioned single vs. double equals signs always tripping me up and causing bugs in my code--- turns out they used to baffle my instructor too! He's able to use them in their proper places without thinking now, which is encouraging. Regardless, I have never felt this audio more keenly than today:
youtube
I had planned on getting some practice with 3D modeling for low-poly V-tuber of my persona I've been jokingly working on, but that didn't work out as anticipated. I did spend a while admiring how I went from a giant gray cube to this, though:
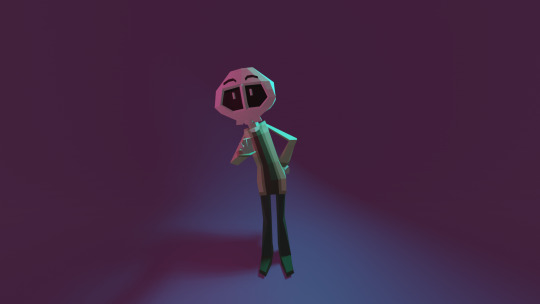
Ahhh. Look at that beautiful skeleton. So few polygons. So few worries. If only I could figure out how make the pupils move or make a bow.
I also spent a while reminiscing about how Blender lit up in flames at one point and I didn't understand why it happened or how I got it to stop. That was a fun seven minutes of unadulterated terror.
I'm tempted to get back into Blockbench for its simple UI, but after learning the basics of Blender, I know it'd be unbearable to return to the rigidity of working in a program that's pretty much built for Minecraft modders. I just need to stick with Blender and find a few more tutorials to keep me going.
I will miss the fact that Blockbench automatically puts your model on a turntable and offers to pixelate it for you, though. It makes low poly modeling so cool so fast.
Just look at these things! They're so cool! I made them yet they look like something out of my fave childhood video games!
I tried to figure out Super Mario Paint this morning and ended up with my first finished song from that program. Tried importing a few soundfonts from other sources but had no luck getting them to work, and the song was definitely rough around the edges--- but I'm still really proud of myself for making a quick tune! It was a battle to figure out how to export the finished product, and I ended up just recording my desktop with OBS to get it to capture the sound and video together, then converted that video into an MP3 file. It was a very roundabout process, but still!!! I made a thing!
The Shy Guy and Boo instruments, as their flawless character designs may have you suspect, are vastly superior to everything else contained in the program. You can't change my mind.
Also, I was tinkering around with Chrome Extensions and found the most heartbreaking note in the description for one of them.
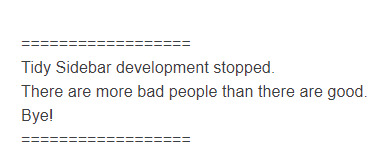
Tiny Sidebar developer, whoever you are, wherever you are--- I want to give you a hug and a slice of cake or two. Reading this activated my inner anime protagonist and I want you to know that there are so many good people out there, but they're quiet about their goodness. Bad people are just loud as heck and make scenes wherever they go.
With that sudden sappiness, I'm signing off on this check-in. Take a parting teaser for a future joke animatic as a palette cleanser. Depressed Friend will be Twig, Emotionally Stable Friend will be Celebi.
Sincerely, Sofie
#sofie checks in#3D model#3d modeling#blender3d#low poly#low poly art#mario paint#super mario paint#preptober#nanowrimo rebel#nano rebel#The Present is a Gift AU Update
7 notes
·
View notes
Text


Download is in the description of this post in my deviantart gallery.
Big ol' updated model pack of my oc, Saki! SDC is 15 years ol, DIU is 18, Adult is 20. Major thanks tonTheBizarreKazeko/@kazekothestrange for creating the SDC and DIU models, and RitaLeader14 for fixing the rigging on these models! This update pack couldn't of happened without them! Thank you both so much!!
Poses are by Snorlaxin, grid is by Touko-p, dome is by hiro K, svssao effect is by Sovoro.
Made a separate model of Adult Saki with the wings because I got lazy and didn't wanna deal with fixing hair physics. The wings are meant to only be used for her ultimate attack or when she's controlling a type b fire.
Sorry for not cleaning the folders up of sphs or toons. This is an update of mostly old models and honestly after how long they've been in production, I rather just release them as is. If the extra stuff bothers you, feel free to delete them.
Please follow the rules!
Rules:
Credit TheBizarreKazeko when using the SDC and DIU models but credit me for the character
Credit me for the Adult model
No VRChat
Ask first before porting models to gmod or sfm
Blender use is fine as long as its kept to your own personal use and you still credit
No redistribution no claiming as your own and no selling the models!
You can take parts
No editing
No R18 no inc*st no p*d*philia!
Do not use the injured face texture on DIU for fetishes what the fuck
Password: Wildfire
She looks best with self shadow off. Only leave it on if you're applying a shader to her that requires the self shadow to be on to look better.
Credits:
All three:
Wings: MMDFakeWings18
Toon: MijumaruNr1
Skin Toon: AceYoen, edited by me
Cloth Sph: AceYoen
Gold hair things: Just recolored hair
Both SDC and DIU:
Face: TDA, edit was taken down and can no longer be found
Hair: MMDFakeWings18
Hair tex: Shioku-990
Eye tex: CarleighE
Face tex- moonuko, edits by TheBizarreKazeko
Base- garbagegobble edits by TheBizarreKazeko re-rigging by RitaLeader14
DIU:
Qipao- Your-friend-Sushi
Shoes, earrings, bubble gum, sunhat- Tehrainbowllama
Hair Accessory- ScarlettAckerman
Sock Lace- Reseliee
Rings- o-DSV-o and NataliS
Back hair- Maddotor2
Socks: Recolored Skin
Injured face texture: IT'SNOTMEOwO
DIU and Adult:
Arm tattoo: roosjuh14290
Hair spikes: MMDFakeWings18
Adult:
Back tattoo: Sairenix
Chinese dress plus texture for the dress and sleeves, heels, and the gold roses on her heels: Kooooi's Chinese Dress Teto, dress texture edited in gimp
Hair buns: Kooooi's Chinese Dress Rin. Originally by Montecore I think.
Stocking: Kooooi's Chinese Dress Miku and recolored skin
Base: TDA Miku
Face: TDA, Angelica-Lime, and Nekasan
Face Texture: Cinnabooty
Eyeshadow: TheBizarreKazeko
Earrings: TwilightDashy/Caroline Sun
Arm Sleeves: elina002
Bangs: I looked for literally an hour and I can't find it anywhere so I can only assume it's no longer for download. That or I'm an idiot who passed by it multiple times. If you know the creator please tell me.
Hair texture: tehrainbowllama
SDC:
Sleeves and dress: MMDFakeWings14
Shoes: Jasperkins and Shiro-NekoVocaloid
Fluff sph: Neverlia
#jjba oc#oc#original character#MMD#MikuMikuDance#Saki#model#3D#3D model#digital art#qipao#chinese dress#cute#anime#anime girl#download#dl#model download#model dl#jojo#jojo no kimyō na bōken#jjba#jojo’s bizarre adventure#3D model download#3D model dl
8 notes
·
View notes